 www.boatplanseasy.com ```html
 Introduction: The Thrill of DIY and a Custom Pontoon Trailer Building your own pontoon boat trailer might seem daunting, but with the right plans, tools, and a bit of elbow grease, you can save money and customize it to perfectly fit your needs. This guide will walk you through the process, step-by-step. Before we begin, ensure you have access to welding equipment and are comfortable using it or have a qualified welder on hand. Safety is paramount. Always wear appropriate safety gear. These steps assume you have already acquired or created a detailed building plan.
Step 1: Gathering Materials and Tools It is crucial to gather all necessary materials and tools before starting the build. This will streamline the process and prevent unnecessary delays. Steel: Square tubing, channel iron, angle iron (dimensions based on your plans) Axles and Suspension: Choose the correct capacity for your pontoon boat. Wheels and Tires: Matched to the axle capacity. Coupler: The part that attaches to your tow vehicle. Ensure it's the correct size and rating. Lights and Wiring: Trailer lights (brake, turn, running lights), wiring harness, connectors. Fenders: To protect your trailer and other vehicles from road debris. Winch and Strap: For loading and securing the pontoon boat. Rollers or Bunks: To support the pontoon boat. Paint or Coating: To protect the steel from rust. Welding Equipment: Welder, helmet, gloves, safety glasses. Cutting Tools: Angle grinder, metal cutting saw. Measuring Tools: Tape measure, level, square. Drilling Tools: Drill, drill bits. Clamps: To hold pieces together during welding. Safety Gear: Safety glasses, welding gloves, respirator.
Step 2: Cutting the Steel Carefully measure and cut the steel according to your pontoon boat trailer plans. Accuracy is vital for a well-aligned and structurally sound trailer. Double-check all measurements before cutting. Use appropriate cutting tools for the thickness and type of steel. Grind any sharp edges or burrs after cutting. Label each piece of steel with its corresponding part number from the plans to avoid confusion.
Step 3: Assembling the Frame Begin assembling the main frame of the trailer. This typically involves welding together the square tubing and channel iron to create the structural skeleton. Tack weld the pieces together first to ensure proper alignment. Use a square and level to ensure the frame is straight and true. Once you are satisfied with the alignment, fully weld the joints. Ensure all welds are strong and free of defects.
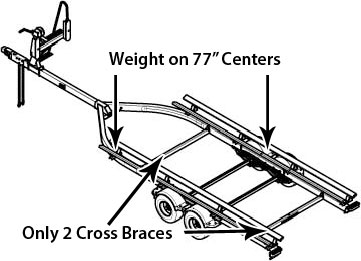
Step 4: Installing the Axles and Suspension Attach the axles and suspension system to the frame. This step is crucial for ensuring proper weight distribution and a smooth ride. Position the axles according to your trailer plans, considering the weight and balance of your pontoon boat. Weld or bolt the suspension components to the frame, following the manufacturer's instructions. Ensure the axles are aligned properly to prevent premature tire wear.
Step 5: Adding Rollers/Bunks and Winch Install the rollers or bunks that will support the pontoon boat. This is a critical step for preventing damage to the boat during loading and transport. Mount the winch and install the strap. Position the rollers or bunks to match the shape of your pontoon boat hulls. Securely attach the rollers or bunks to the frame using bolts or welds. Install the winch at the front of the trailer, ensuring it is properly aligned with the bow of the boat. Test the winch to ensure it operates smoothly.
Step 6: Wiring and Lights Install the trailer lights and wiring harness. This step is essential for ensuring your trailer is legal and safe to tow. Run the wiring harness through the frame of the trailer, securing it with zip ties or clamps. Connect the lights to the wiring harness, following the manufacturer's instructions. Test the lights to ensure they are functioning correctly (brake lights, turn signals, running lights).
Step 7: Installing Fenders and Coupler Attach the fenders to protect your trailer and other vehicles from road debris. Install the coupler for connecting the trailer to your tow vehicle. Position the fenders over the wheels, ensuring they provide adequate coverage. Weld or bolt the fenders to the frame. Attach the coupler to the front of the trailer, ensuring it is securely fastened.
Step 8: Painting and Finishing Prepare the trailer for painting by cleaning and degreasing the steel. Apply a coat of primer followed by a coat of paint to protect the steel from rust and corrosion. Sandblast or wire brush the steel to remove any rust or mill scale. Apply a coat of metal primer. Apply one or two coats of paint.
Step 9: Final Inspection and Adjustments Perform a thorough inspection of the trailer to ensure everything is properly installed and functioning correctly. Make any necessary adjustments. Check all welds for cracks or defects. Ensure all bolts are tightened properly. Test the lights, brakes, and winch. Adjust the rollers or bunks as needed to properly support the boat.
Conclusion: Your Custom-Built Pontoon Trailer Congratulations! You've successfully built your own pontoon boat trailer. Remember to always prioritize safety and perform regular maintenance to ensure your trailer remains in good condition. Enjoy the water!
``` Pontoon Boat Trailer Building Plans Os, Yacht Builders Turkey Limited, Bass Boat Trailer Tires
 www.boatplanseasy.com
 Pontoon Boat Trailer Building Plans Os, Yacht Builders Turkey Limited, Bass Boat Trailer Tires
 www.boatplanseasy.com
 Pontoon Boat Trailer Building Plans Uk
www.boatplanseasy.com  jooinn.com ```html
  tatnuckmeatandsea.com
  www.medicalnewstoday.com
  southlandrealtors.com
  materialsoftheworld.com
  billyoh.com
  www.walmart.com
  www.woodenstreet.com
  www.creativefabrica.com
  fity.club
  encyclopedia.pub
  www.dailytelegraph.com.au
  hrlhydroplane.com ```html
  hydroplanehistory.com
  missmadisonhydro.com
  zimmergren.net
  www.broadbandsearch.net
  www.triumphmotorcycles.com
